Tuesday, November 5, 2013

Falling for Fall: Caramel Corn

'Tis the season for family, friends and faith.  A little season this modern day Cinderella likes to call "fall".  What?  You've heard of it too?  Well thank the heavens I am not the only one who partakes in the effervescent season of kitchens which smell of baked apples and yards which look like Crayola created a "Fall" box just for the Midwest. 

Last weekend, my sweet niece and nephew hosted their Annual Halloween Bash.  Lane and Marley sure know how to throw a party for the little peeps and the big peeps. Abby and Justin so graciously hosted us, filled our bellies and made for another memorable gathering. 

Abby was generous enough to let me handle the desserts.  I secretly LOVE when she hosts as I always get to bring the goodies.  This year, I went with my never-fail pumpkin-esq dessert extravaganza. 

The great thing about fall gatherings is no one is concerned about how much they eat or what the calorie consumption is.  I think biologically we are all ready to fatten up and prep for the cold (shhhhh....) months ahead.  Not only is it a season centered around family and friends but it is also a season centered around mouth-watering-foodgasm recipes. 

Y'all keep up if you can....

  (are y'all drooling....pretty sure you should be) 

Ingredients
8-9 cups popped popcorn (you can use the bag or the kernels and if it is kettle corn, all the better)
1 cup packed light brown sugar
1/4 cup unsalted butter (yes, it needs to be unsalted)
1/4 cup light corn syrup
1.5 tsp pumpkin pie spice
1/4 tsp cloves
1/2 tsp salt
1/4 tsp baking soda
1 package white chocolate chips (I LOVE Hersheys)

Directions
  1. Pop that popcorn and remove those kernels!  None of your guests want to chip a tooth. 
  2. Preheat the oven to 250.  Not a bit above and not a bit below.
  3. In a sauce pan, small, melt your butter on low heat.  Don't brown it. 
  4. Add brown sugar, pumpkin pie spice, cloves, and corn syrup, to your butter.  Increase the heat to medium high and mix.  Let that pan of yummy deliciousness melt together and begin to boil. 
  5. Once it boils, leave it alone for 4 minutes (I know, it is difficult).
  6. Remove from heat, add baking soda and vanilla. 
  7. Listen to the fun sounds the pan makes when you add the vanilla.  Serious y'all, I was in AWE.
  8. Mix, mix, mix.  The delicious caramel mix will begin to look glossy.  Once it thickens, you know it is ready to meet the popcorn.
  9. In a big bowl, mix the popcorn and the caramel from your sauce pan.  Mix, mix and mix until it looks covered.
  10. Spread into a large baking pan (I like to use a turkey-size roaster pan).
  11. Place that bad boy in the oven for 1 hour and make sure you stir AT LEAST every 10-15 minutes. 
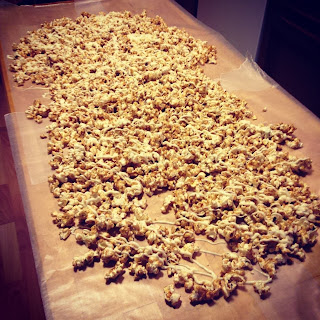
  12. Once your timer goes off, remove it from the oven and pour the caramel corn onto parchment paper.  Spread it out and let it sit for a bit.
  13. In a microwave safe bowl, melt the white chocolate chips.  Make sure you melt like this:  20 seconds, mix, 20 seconds, mix, 20 seconds, mix, etc. 
  14. When you know its all melted, pour into a little ziplock baggie and snip off a little corner.
  15. Drizzle over your caramel corn and let sit for at least 1 hour.

  1. OMG IT LOOKS DELICIOUS
  2. Store it in ziplock baggies and enjoy.  Brag. Spread the love.  Share the joy.
XOXO,
All the way from MN

Tuesday, October 8, 2013

Auntie to the Rescue: Yummies for Sensitive Tummies.

I've not yet introduced y'all to my insanely sweet, handsome and ridiculously smart nephew.  Meet Reese.  97% for weight at 10% for height.  He is a whole 'lotta goodness packed into one sweet little bundle.
We have a load of fun together.  He's taught me the art of wrestling, watching bulldozers and the sweetness which a little boy can bring to this modern day Cinderella's life.

This weekend, with my family, we explored Nate's 101 Market in Elk River.  For my fellow Minnesotans, if y'all have not yet been, I seriously recommend bringing your little peanut(s) for a trip.  The place was a child's harvest wonderland; we explored everything from pedal carts to duck races and llamas (yea, just like the book "Is Your Momma a Llama").

I could go on and on and on for a million years, bragging him up.  Someone asked me this weekend if Reese makes me want my own soon; my response (if you've read my blog you know just how much I look forward to the day I become a wife and mother), of course put a bit more graciously, "heck yes"!

A few months ago, he was diagnosed with an allergy to peanuts, milk and eggs.  If you've read my blog before, y'all know that I cook with three main ingredients:   Butter.  Milk.  Eggs.

This changed pretty quickly.  I've not come to terms with the idea of "vegan" baking and cooking, so getting creative can be a little difficult, especially since I know how much little people love Kraft Mac 'n' Cheese....BUT have no fear, Auntie is here.  I decided that being "World's Best Greatest Auntie" includes adjusting my love for cooking to fit this little man's needs.  But seriously y'all, who could resist that sweet little smile.

I have spent much time getting to know vegan-style products.  My heart hates buying anything premade (1) trust issues and (2) EWWWWW.  Thus began the start of my newest baking craze.

We have tried a few out.  This handsome little devil's smokin' hot Momma made him a delicious zucchini bread and his smokin' hot Grandma made him Reese-Friendly Fried Chicken (recipe to come). Enough about us.....let's get to the good stuff.

For those of you that know the food-blogger world, there are some amazing men and women out there sharing what they know.  I'm a big huge gigantic fan of anything Paula Dean fixes up and my sweet southern best friend's momma (Mrs. Bradford makes an insane southern dinner).  The swap to a 'different' way of cooking has been a challenge - but when have I ever turned down a good challenge (insert comments now)?

My newest addiction is this beautiful young lady's blog.  Megan from Detoxinista, not only is she gorgeous and smart but she also has some of the most amazingly delicious recipes and I cannot post my new favorite without giving her full credit where credit is due (think my favorite country song - "I gotta give credit where credit is due").

Vegan Mac 'n' Cheese

Looks BETTER than Kraft!

A little bit of healthy makes a little tummy happy!  Here is how....

For the Cheese
1.5 cups raw cashews
3 TBSP fresh lemon juice (I used the bottled)
3/4 cup water
1.5 tsp sea salt
1/4 cup nutritional yeast
1/2 tsp chili powder
1/2 clove garlic
pinch of turmeric and cayenne
1/2 tsp mustard (I used dijon - but you can use yellow)

For the Pasta
8 ounces of pasta (your choice - you can use rice, regular, brown, colored, purple or homemade - purple is clearly a joke y'all - but whatever floats your noodle)

A little add in FUN

  • veggies (fresh or frozen)
  • chicken
  • any meat (or faux meat)

Just follow my fave blogger friend's instructions below and you will have a phenom masterpiece coming out of your oven! 

  1. Preheat the oven to 350F (If you are adding roasted broccoli to your dish, this would be a good time to start preparing that, so it can roast in the oven while you work on the rest!) You should also start boiling some water to prepare your pasta.
  2. If you have a Vita-Mix, or other high-powered blender, making this sauce is incredibly easy. Simply throw the first ten ingredients into the blender, and blend until smooth and creamy!
  3. If you do not have a high-powered blender, don’t worry– you can easily use a food processor or blender to process the cashews first, until they are finely ground, or ideally, a nut-butter-like consistency. Once your cashews are thoroughly processed, add the rest of the ingredients and process until thick and smooth.
  4. At this time, you should check your pasta. Once it’s cooked to your liking, drain and rinse it, then return the pasta to the pot to be mixed with the cheese sauce.
  5. If you’re adding any roasted or sauteed veggies, this would be the time to do it. I highly recommend adding roasted broccoli to this dish!
  6. Serve immediately while hot, or move on to the next step for baking.
Baking Instructions: (optional)
  1. Once you’ve mixed everything together, pour the mac n’ cheese into an 8 x 8 square dish and garnish with a sprinkle of paprika and black pepper. Bake at 350F for 20 minutes.
  2. Let cool for about 5 minutes, then serve!

Xoxo (from Minnesota)

Thursday, May 30, 2013

Too long.

I cannot believe how long it has been since I've blogged.  I feel like I've neglected my baby :(

It's a new year, with new adventure and so many new stories to tell.  I've also been busy in the kitchen.

Stay tuned for an update on this Modern Day Cinderella's adventures....


Xoxo,
From Minnesota