Monday, July 6, 2015

Options.

Options are amazing things.  Options in the closet, options in the color car you purchase, options in baking, options in decorating.  We live a life full of options; we consistently, whether consciously or not, have to make a choice.  Those options affect everything from our mood, to the time we leave the house, to the way we feel.

The things or actions we choose, regardless of what they may be, also affect others.  Options affect our character, our destiny.  The options we choose affect us at the very core.  The choices we make directly affect who we are, and what we represent.  We will get to the big picture later.

To perk things up, let's talk about options when baking.

A very healthy field of choices, my favorite option in baking is frosting.  One can turn a boring loaf of banana bread into an exceptional mouth-pleasing dessert, simply by adding cinnamon cream cheese frosting.  Simple muffins can be drizzled with glaze to sweeten, or semi-sweet chocolate frosting to add a bit of bitter (say that 5 times...bit of bitter).

Today's post focuses on red velvet cupcakes:  canned frosting or homemade?

I would argue that not very many people can taste the difference between the two, however, this Modern Day Cinderella never puts out canned frosting.

Red velvet cupcakes (and the plate of cream cheese stuffed red velvet brownies you see) are worthy of only one thing:  homemade cream cheese frosting.  Why you ask?  Simple.  Red velvet cupcakes are a soulmate cupcake.  They are the unicorn of all cupcakes; the epic once-in-a-lifetime mouth full of goodness so incredible it makes you weak in the knees.  Ya, they are THAT freakin-delish.

Homemade cream cheese frosting really isn't too difficult to make.  Basically you take a few ingredients, make sure your cream cheese is softened, throw it in your mixer....and "whhhhhallla".

Here is my secret to the perfect sweet vs. bitter cream cheese frosting.  Soulmate worthy.

Ingredients
1/2 cup butter, softened
1 (8-oz) package cream cheese, softened
1 (16-oz.) package powdered sugar (shu-gah dahling)
1 tsp. vanilla extract

Directions

  1. mix butter + cream cheese until it is good and creamy and fluffy.  It should look shiny and delicious.
  2. Gradually add everything else.  Stick your finger in to taste (after shutting off the mixer), but beware, one taste is never enough.  I told you, soulmate worthy. 
Another fun trick to note, I didn't use a piping bag or tool for these sweet luvin' cupcakes.  

When left without, fill a sandwich size baggie with your frosting.  Clip a small corner off the baggie and again "whhhhallla"- piping bag created.  

Back to the moral of the story:  options.  I'm sure you've seen the quote "never be someone's option".  This is really, really for real the truth.  Although life is full of so many options, remember that falling in love or falling for someone means that you and he/she should never be an option for the other.  Much like the soulmate-unicorn cupcake, YOU should be a choice, never just an option.  I think we often forget this important aspect; likely because we are so flooded with options in everyday life.  

Never settle for being someone's option.  Always have enough respect for yourself to be someone's choice.  This Modern Day Cinderella needs to remind herself of that from time to time.  Baking brings out these epic life lessons; I hope know that someday when I find my Modern Day Prince Charming, I will be his choice and never feel like just his option.  

xoxo (from Minnesota),
Me 


Tuesday, December 30, 2014

Single Girl. Will Travel.

If you didn't know, now you know:  I am single.  Yep.  I've actually not had a "boyfriend" (by definition) since high school.  And if he's reading, it wasn't you that wrecked the idea of dating for me.  I've met/dated them all:  doctors, lawyers, investment bankers, medical sales reps, liberals, headhunters (Arizona you know I mean you), boys from Berlin, VPs, divorcees, hedge fund sales partners, principals at large companies, introverts, entrepreneurs, farmers, fisherman, CFOs, accountants, and I'm sure I forgot a few....

There are a million reasons why I have not found "the one" or "the one right now".  I could start listing, but I feel like the focus of this post might take a turn down the Road Which Leads Nowhere.

Let's clarify a few things:

  1. I'm a busy girl.  I love my career, I am successful, independent and pretty damn happy with life. 
  2. I've not found the one that makes my heart pitter-patter (and believe me, I have been through my fair mix of first dates). 
  3. I have no dying need to get married, yet.  Certainly I'd love someone to wake up next to, and cook for, and take care of the "things" only a man is able to do.  But what's the rush?
  4. My eggs are not going anywhere.  If my mom is reading this, you know the doctor specifically told you my parts are working just fine.  
Now that we've got the "why she's still single" thing covered, let's break into a more enjoyable topic:  Single Girl.  Will Travel.  

Did you know I wanted to be the 1st Female President of the United States?  Yep; and a home designer, and a politician, geneticist and a nurse.  My point being: this brain has no limits.  When this Modern Day Cinderella's mom and dad told her to imagine and dream big, she really did.  With that desire to conquer the world, came a desire to see the world.  I spent my 20's trying to "find" people to travel with.  I don't have a lot of friends, and my family isn't in love with traveling; so I told myself time and time again that I would indeed travel to the best places when I had the man of my dreams by my side.  I wanted to make-out on a bench in Paris; take one of those little boats in Venice; lay naked on a beach in Bali and make love; hold hands on the French Riviera; WHEN I found a man who loved me.  Did I also mention I'm a romantic?

Shortly after turning 30, BAM, it came to me: I don't need a man, or my nonexistent group of friends, or even my family, to travel....I only need myself, a passport and really cute shoes to travel (because every nationality knows a cute pair of shoes - it's a great conversation starter).   And who knows, this Modern Day Cinderella might just run into Prince Charming....or a few. 

Thus was born my 2015 blog focus.  Life in Heels and Pearls takes on a year of solo traveling.   So sit back, grab a glass of wine, open the Nordstrom's shopping site on a 2nd screen, and enjoy the trip.  

Xoxo from Minnesota,
Me

Monday, March 24, 2014

Grown Up Chicken. It's Really Good For You.

Chicken can get really boring. Boring like that shade of lipstick you HAD to get for that wedding you were in two years ago (I promise my future bridesmaids y'all will have stellar cute lip GLOSS).  Boring like waiting in line for the coffee shop to open.  Boring like a bad kiss on an even worse date. 

Here's what happened when I woke up Sunday morning:  I decided to suck up it up and move on (y'all who know, know what I am talking about), I decided to run four miles AND THEN I decided to bake like the coming back of Jesus was about to happen...because undoubtedly so, I will have killer caramel rolls set and ready for that occassion. 

Chicken was thawing in the fridge, my hair was still messy and I was kicking it in an apron and Lululemon leggins (quite the image, eh?).  My Pinterest Boards are overflowing like a spring flood, so this modern day Cinderella decided it was time to alleviate some of that backup.  Enter Chicken Stuffing Creativity 101. 

Chicken (and pork) is a really versatile food.  I know, I know, y'all are probably thinking "but chicken is bland and boring you blonde weirdo!"; BUT here is the kicker, spicing up chicken (much like spicing up the bedroom in a marriage) is actually really easy and fun. 

Go to your fridge, go on and do it, pull out that thawed chicken, any type of cheese you have (the more the merrier when dairy is involved), greens, eggs, and garlic.  THEN go to your cupboard, pull out breadcrumbs,  that lovely girl named PAM, and some salt + pepper. 

Are y'all still with this girl?  Mmk. Here. We. Go.

(1)  Take four eggs and separate them into egg whites.  Toss those yolks (or keep 'em).  Fluff 'em up and sprinkle a wee bit of salt + pepper in.  Mix in your cheese!  For my saucy chicken (it was like a lacy white nighty from VS - confident and basic with a bit of an edge), I used 1/2 cup part skim ricotta, 1/4 cup shredded parm and 1/4 cup mozzarella.  Let that sit aside and get all gooey. 

(2) In a sauce pan, add 1-2 cups chopped greens (I used spinach and asparagus).  Add a few TBSP garlic and saute it like its hot until your greens wilt and the kitchen smells overwhelmingly good (like you just want to take a bite out of the air).  Mix those greens in with your egg/cheese goodness.  TA DA - y'all have your stuffing completed. 


(3) The fun part comes when you get to smash that chicken breast into a flat piece of chicken.  Carefull so you don't wreck it; they are a wee bit delicate.  So repeat this for your 4-6 chicken breasts. 

(4) Set up your counter in this order:  Bowl of egg/cheese goodness, Bowl of egg whites (y'all will have to crack a few more), and Bowl of breadcrumbs.  Starting on the far left, fill your chicken with the egg/cheese goodness, then roll it up (pack it and mark it with a B - jk), drop it in the egg whites and then coat that bad boy with breadcrumbs.  Place your stuffed breast seam down in the pan. 

(5) Repeat for all your flattened breasts.  Place those pans in the ove at 450 for 25 minutes.  It's an amazing outcome - the egg white within your stuffing makes it fluffy and lite.  When you bring them out of the oven, top with a little marinara sauce and sprinkle with cheese. 

INGREDIENTS
  • Boneless chicken breast (4-6)
  • 1 cup breadcrumbs
  • 1/2 cup parmesan cheese (shredded)
  • 2 cups chopped spinace
  • asaparagus (10-12 stalks chopped - should you so desire)
  • 1/2 cup part-skim ricotta
  • garlic (I use the stuff from a jar)
  • Eggs or egg whites
  • 1/2 cup mozzarella cheese
  • marinara sauce
Eat, love and be merry.  Your tummy will thank me for this recipe.

XOXO,
All they way from MN

Turning 30.


Amazing things happen in life when you least expect it.

My beautiful Momma would tell you that falling in love with life is what happens when you are busy enjoying every day to it's utmost potential. This modern day Cinderella would agree...and then add: a beautiful life starts with being so full of love you are almost ready to burst. The past decade blessed me with so many opportunities: I began my first company, I became an Auntie and a Godmother, I shared in the joy of both my parents finding love AND my Grandmother finding love once again. Our family grew; I bet my Grandpa is looking down from Heaven with a pride so big it would burst the hearts of most boys I have dated. I found an amazing group of girlfriends. I flew across the big pond and experienced Europe all by myself. I survived my first major surgery and our prayers were answered when both my momma and sister came through their surgeries.

With age comes wisdom (and your IQ naturally increases when you turn 30....legit for real, I'm Einstein now). I have learned loving life comes with having the patience to wait for the rest of it to happen. Although I love my family, I believe this girl has had enough "why haven't you found a boyfriend?" confrontations for an entire lifetime (if y'all are reading this, take note). I'm not sure how, but I manage to keep my temper in check while wanting to scream, "YES, I would love to be married and getting ready for Baby #2". Life Lesson #1: have patience.

With age also comes an array of interestingly awful 1st, 2nd and 3rd dates; y'all are just eager to read about the 2nd date which ended in the ER, or the 1st date which ended up having more girls than just me along, or perhaps the 4th date that came with a full lecture on dating men for their money (which I will note is just awful - and why on Earth would you marry a man for money when a girl can make her own?).

This next decade, I plan to fully enjoy life increasingly more. And as my sister would say, share my over abundance of love with everyone all over again. Welcome to Life in Heels and Pearls: 30 and Beyond.

Tuesday, November 5, 2013

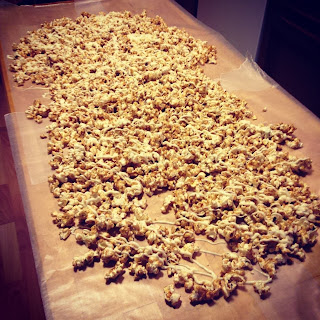
Falling for Fall: Caramel Corn

'Tis the season for family, friends and faith.  A little season this modern day Cinderella likes to call "fall".  What?  You've heard of it too?  Well thank the heavens I am not the only one who partakes in the effervescent season of kitchens which smell of baked apples and yards which look like Crayola created a "Fall" box just for the Midwest. 

Last weekend, my sweet niece and nephew hosted their Annual Halloween Bash.  Lane and Marley sure know how to throw a party for the little peeps and the big peeps. Abby and Justin so graciously hosted us, filled our bellies and made for another memorable gathering. 

Abby was generous enough to let me handle the desserts.  I secretly LOVE when she hosts as I always get to bring the goodies.  This year, I went with my never-fail pumpkin-esq dessert extravaganza. 

The great thing about fall gatherings is no one is concerned about how much they eat or what the calorie consumption is.  I think biologically we are all ready to fatten up and prep for the cold (shhhhh....) months ahead.  Not only is it a season centered around family and friends but it is also a season centered around mouth-watering-foodgasm recipes. 

Y'all keep up if you can....

  (are y'all drooling....pretty sure you should be) 

Ingredients
8-9 cups popped popcorn (you can use the bag or the kernels and if it is kettle corn, all the better)
1 cup packed light brown sugar
1/4 cup unsalted butter (yes, it needs to be unsalted)
1/4 cup light corn syrup
1.5 tsp pumpkin pie spice
1/4 tsp cloves
1/2 tsp salt
1/4 tsp baking soda
1 package white chocolate chips (I LOVE Hersheys)

Directions
  1. Pop that popcorn and remove those kernels!  None of your guests want to chip a tooth. 
  2. Preheat the oven to 250.  Not a bit above and not a bit below.
  3. In a sauce pan, small, melt your butter on low heat.  Don't brown it. 
  4. Add brown sugar, pumpkin pie spice, cloves, and corn syrup, to your butter.  Increase the heat to medium high and mix.  Let that pan of yummy deliciousness melt together and begin to boil. 
  5. Once it boils, leave it alone for 4 minutes (I know, it is difficult).
  6. Remove from heat, add baking soda and vanilla. 
  7. Listen to the fun sounds the pan makes when you add the vanilla.  Serious y'all, I was in AWE.
  8. Mix, mix, mix.  The delicious caramel mix will begin to look glossy.  Once it thickens, you know it is ready to meet the popcorn.
  9. In a big bowl, mix the popcorn and the caramel from your sauce pan.  Mix, mix and mix until it looks covered.
  10. Spread into a large baking pan (I like to use a turkey-size roaster pan).
  11. Place that bad boy in the oven for 1 hour and make sure you stir AT LEAST every 10-15 minutes. 
  12. Once your timer goes off, remove it from the oven and pour the caramel corn onto parchment paper.  Spread it out and let it sit for a bit.
  13. In a microwave safe bowl, melt the white chocolate chips.  Make sure you melt like this:  20 seconds, mix, 20 seconds, mix, 20 seconds, mix, etc. 
  14. When you know its all melted, pour into a little ziplock baggie and snip off a little corner.
  15. Drizzle over your caramel corn and let sit for at least 1 hour.

  1. OMG IT LOOKS DELICIOUS
  2. Store it in ziplock baggies and enjoy.  Brag. Spread the love.  Share the joy.
XOXO,
All the way from MN

Tuesday, October 8, 2013

Auntie to the Rescue: Yummies for Sensitive Tummies.

I've not yet introduced y'all to my insanely sweet, handsome and ridiculously smart nephew.  Meet Reese.  97% for weight at 10% for height.  He is a whole 'lotta goodness packed into one sweet little bundle.
We have a load of fun together.  He's taught me the art of wrestling, watching bulldozers and the sweetness which a little boy can bring to this modern day Cinderella's life.

This weekend, with my family, we explored Nate's 101 Market in Elk River.  For my fellow Minnesotans, if y'all have not yet been, I seriously recommend bringing your little peanut(s) for a trip.  The place was a child's harvest wonderland; we explored everything from pedal carts to duck races and llamas (yea, just like the book "Is Your Momma a Llama").

I could go on and on and on for a million years, bragging him up.  Someone asked me this weekend if Reese makes me want my own soon; my response (if you've read my blog you know just how much I look forward to the day I become a wife and mother), of course put a bit more graciously, "heck yes"!

A few months ago, he was diagnosed with an allergy to peanuts, milk and eggs.  If you've read my blog before, y'all know that I cook with three main ingredients:   Butter.  Milk.  Eggs.

This changed pretty quickly.  I've not come to terms with the idea of "vegan" baking and cooking, so getting creative can be a little difficult, especially since I know how much little people love Kraft Mac 'n' Cheese....BUT have no fear, Auntie is here.  I decided that being "World's Best Greatest Auntie" includes adjusting my love for cooking to fit this little man's needs.  But seriously y'all, who could resist that sweet little smile.

I have spent much time getting to know vegan-style products.  My heart hates buying anything premade (1) trust issues and (2) EWWWWW.  Thus began the start of my newest baking craze.

We have tried a few out.  This handsome little devil's smokin' hot Momma made him a delicious zucchini bread and his smokin' hot Grandma made him Reese-Friendly Fried Chicken (recipe to come). Enough about us.....let's get to the good stuff.

For those of you that know the food-blogger world, there are some amazing men and women out there sharing what they know.  I'm a big huge gigantic fan of anything Paula Dean fixes up and my sweet southern best friend's momma (Mrs. Bradford makes an insane southern dinner).  The swap to a 'different' way of cooking has been a challenge - but when have I ever turned down a good challenge (insert comments now)?

My newest addiction is this beautiful young lady's blog.  Megan from Detoxinista, not only is she gorgeous and smart but she also has some of the most amazingly delicious recipes and I cannot post my new favorite without giving her full credit where credit is due (think my favorite country song - "I gotta give credit where credit is due").

Vegan Mac 'n' Cheese

Looks BETTER than Kraft!

A little bit of healthy makes a little tummy happy!  Here is how....

For the Cheese
1.5 cups raw cashews
3 TBSP fresh lemon juice (I used the bottled)
3/4 cup water
1.5 tsp sea salt
1/4 cup nutritional yeast
1/2 tsp chili powder
1/2 clove garlic
pinch of turmeric and cayenne
1/2 tsp mustard (I used dijon - but you can use yellow)

For the Pasta
8 ounces of pasta (your choice - you can use rice, regular, brown, colored, purple or homemade - purple is clearly a joke y'all - but whatever floats your noodle)

A little add in FUN

  • veggies (fresh or frozen)
  • chicken
  • any meat (or faux meat)

Just follow my fave blogger friend's instructions below and you will have a phenom masterpiece coming out of your oven! 

  1. Preheat the oven to 350F (If you are adding roasted broccoli to your dish, this would be a good time to start preparing that, so it can roast in the oven while you work on the rest!) You should also start boiling some water to prepare your pasta.
  2. If you have a Vita-Mix, or other high-powered blender, making this sauce is incredibly easy. Simply throw the first ten ingredients into the blender, and blend until smooth and creamy!
  3. If you do not have a high-powered blender, don’t worry– you can easily use a food processor or blender to process the cashews first, until they are finely ground, or ideally, a nut-butter-like consistency. Once your cashews are thoroughly processed, add the rest of the ingredients and process until thick and smooth.
  4. At this time, you should check your pasta. Once it’s cooked to your liking, drain and rinse it, then return the pasta to the pot to be mixed with the cheese sauce.
  5. If you’re adding any roasted or sauteed veggies, this would be the time to do it. I highly recommend adding roasted broccoli to this dish!
  6. Serve immediately while hot, or move on to the next step for baking.
Baking Instructions: (optional)
  1. Once you’ve mixed everything together, pour the mac n’ cheese into an 8 x 8 square dish and garnish with a sprinkle of paprika and black pepper. Bake at 350F for 20 minutes.
  2. Let cool for about 5 minutes, then serve!

Xoxo (from Minnesota)

Thursday, May 30, 2013

Too long.

I cannot believe how long it has been since I've blogged.  I feel like I've neglected my baby :(

It's a new year, with new adventure and so many new stories to tell.  I've also been busy in the kitchen.

Stay tuned for an update on this Modern Day Cinderella's adventures....


Xoxo,
From Minnesota